Drone Deploy and DJIs POI Mode copter image acquisitions
Using DroneDeploy and the POI mode of DJI (this article was first published on jenacopterlabs.de).
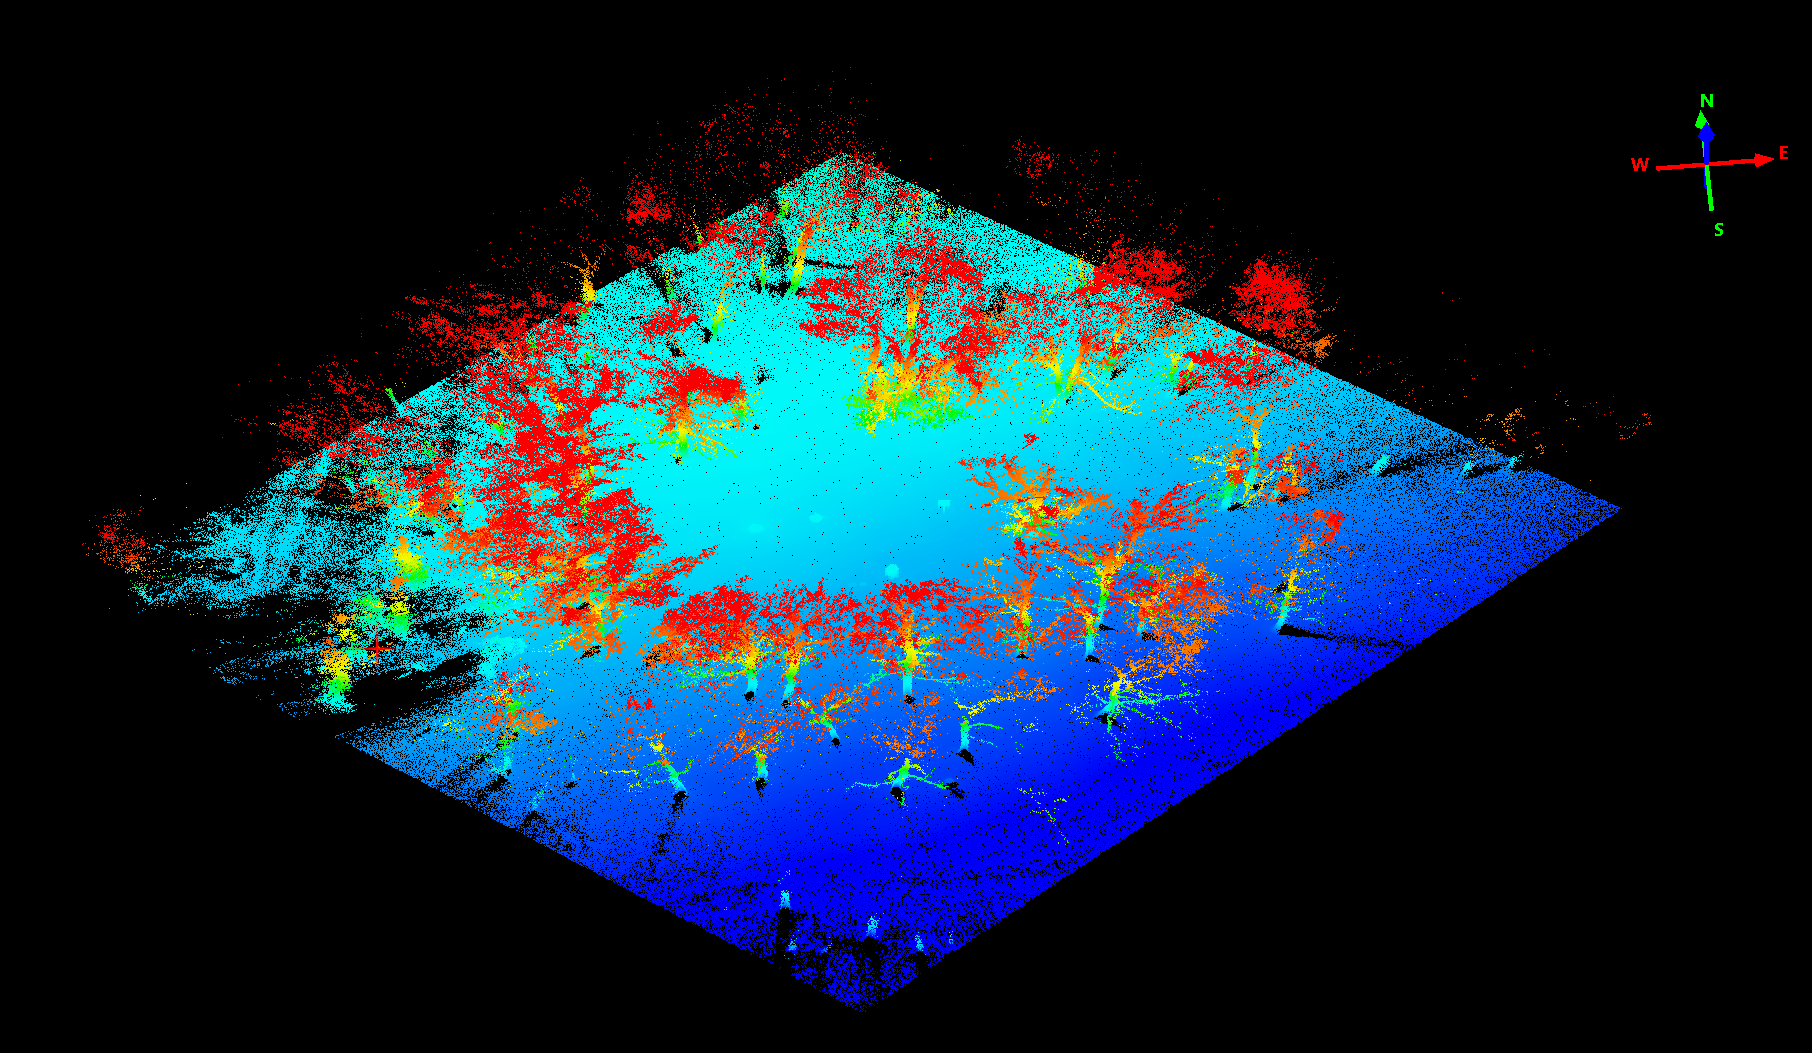
Have been doing some leaf-off flights now in March on one of my favorite sites for complex tree crown point cloud mapping. To add to the leaf-on data from last autumn.
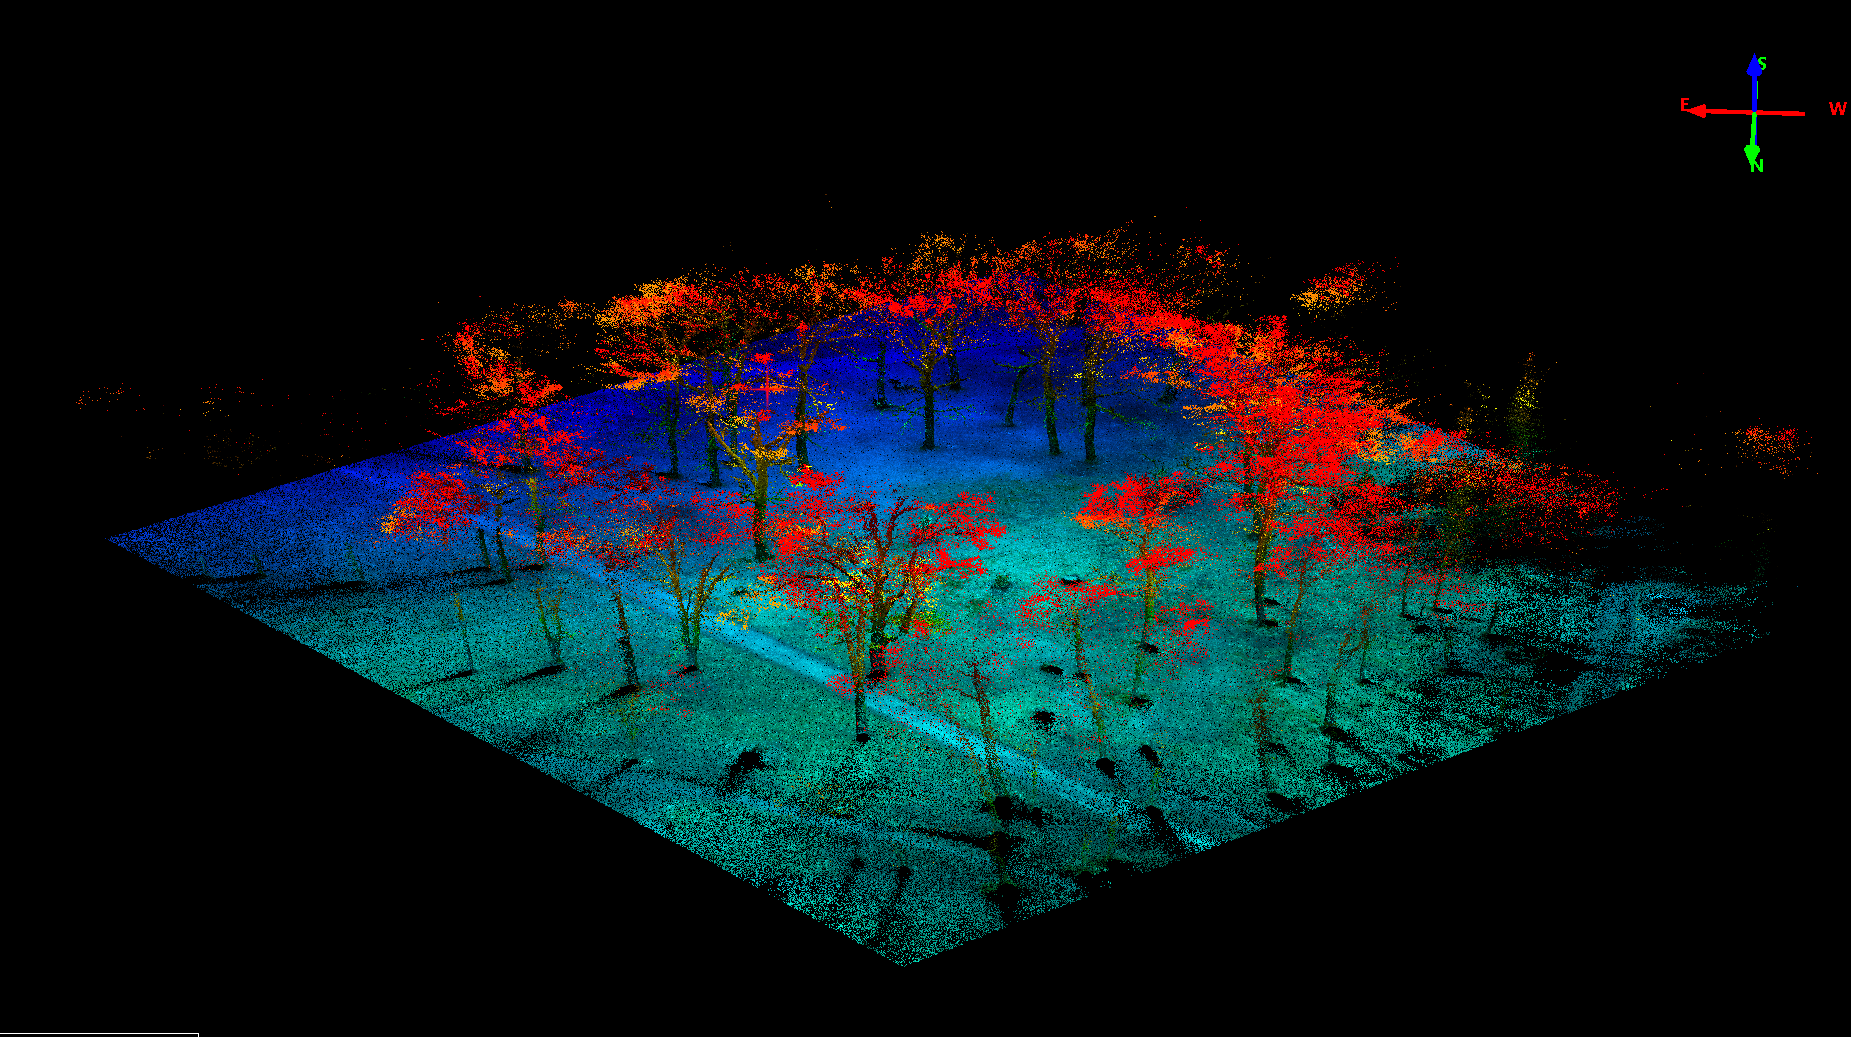
Fig.: Leaf-Off point cloud with combined height color coding and reflectance color coding.
This time I also checked the full automatic flight modi using the POI (Point Of Interest) mode from DJI and Drone Deploy with the P4Pro and the P3A.
Both work perfectly although I believe the POI mode can be dangerous when its done with low altitudes. You have to carefully check that the radius is free from obstacles when you define the center position, altitude and distance from center (radius) for the POI flight. When POI is started it begins with comparably low speeds. You can modify the speed setting when the POI mode started. Unfortunately you cannot modify this stetting before you start. Tuning the speed on an iPad or (even more difficult – on an iPhone) is kind of dangerous because you easily move the slide too much to higher speeds than wanted and the copter will immediately accelerate and start circling your POI object like crazy until you managed to move the slider to slower speeds. There is however always this stop button to kill the POI mode – this is handy and needed sometimes. When you press the stop button the copter stops the POI mode completely and waits for new commands.
A DJI video explains in more detail how this work. For the Phantom 3 you have to move to the F-Mode in the controller first. This is not needed with the P4Pro.
DJI – Intelligent Flight Modi.
Overall POI is great help because you can create very homogenous and dense image coverages of objects from all directions without having to precisely fly manually a constant radius turn with the copter (flying this radius manually & precisely is extremely difficult). Its also a very nice feature for filming and for generating a dense multi image coverage from a footage capture for 3D point cloud mapping. Within image matching software you can immediately see the difference of manually captured POI flight and a fully automatic image capturing. The position and shot direction is just much better concentrating on the main object keeping it precisely in the center of the image. Doing 3-5 POI circles with different altitude creates a very dense set of perspectives and a good overall dataset for point cloud mapping.
In the example below I created 3 different POI altitude levels and one nadir coverage from Drone Deploy. Together these images completely map the 3D structure of the tree and the topography and the Nadir shots provide some context for the test site.
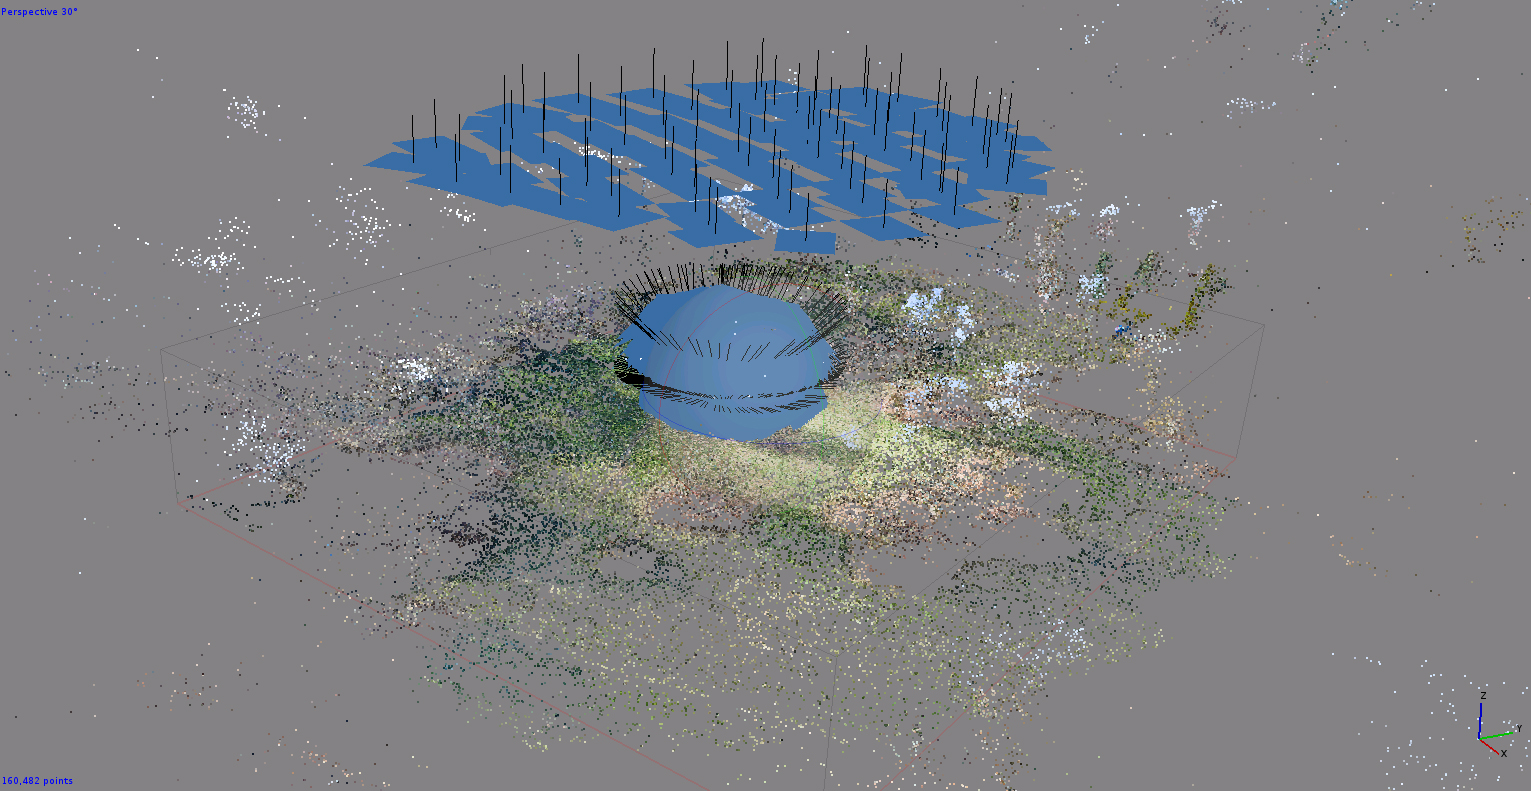
Figure: Image orientation after Alignment in Agisoft with both flights included here in one project (Drone Deploy Nadir mosaic and the POI multilevel data set below the Nadir mosaic data). The dense sphere of POI mode based images captured with lots of overlap is visualized here as one dense blue object.
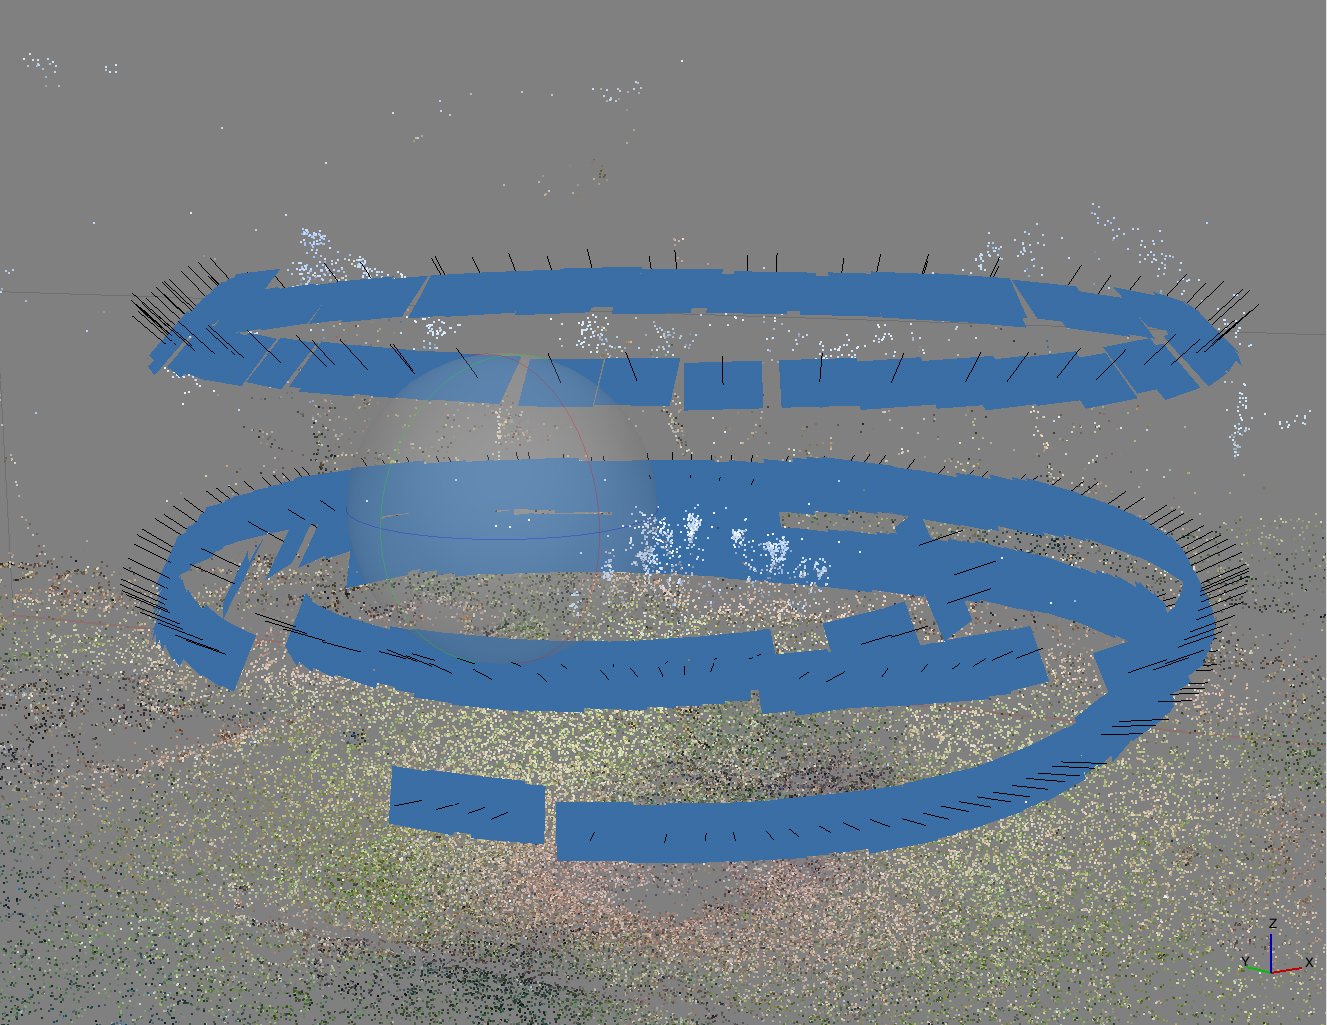
Figure: Subset of the POI generated image orientation visualization in Agisoft with a very preliminary point cloud after image alignment (360 shots). Dense point cloud visualization will be added later. Clearly the leaf-off situation seems to be a challenge for SFM approaches and high resolution mode processing times on 24 core Xeon hardware are between 3 days and 2 weeks … . This is not acceptable anymore for testing different setups.
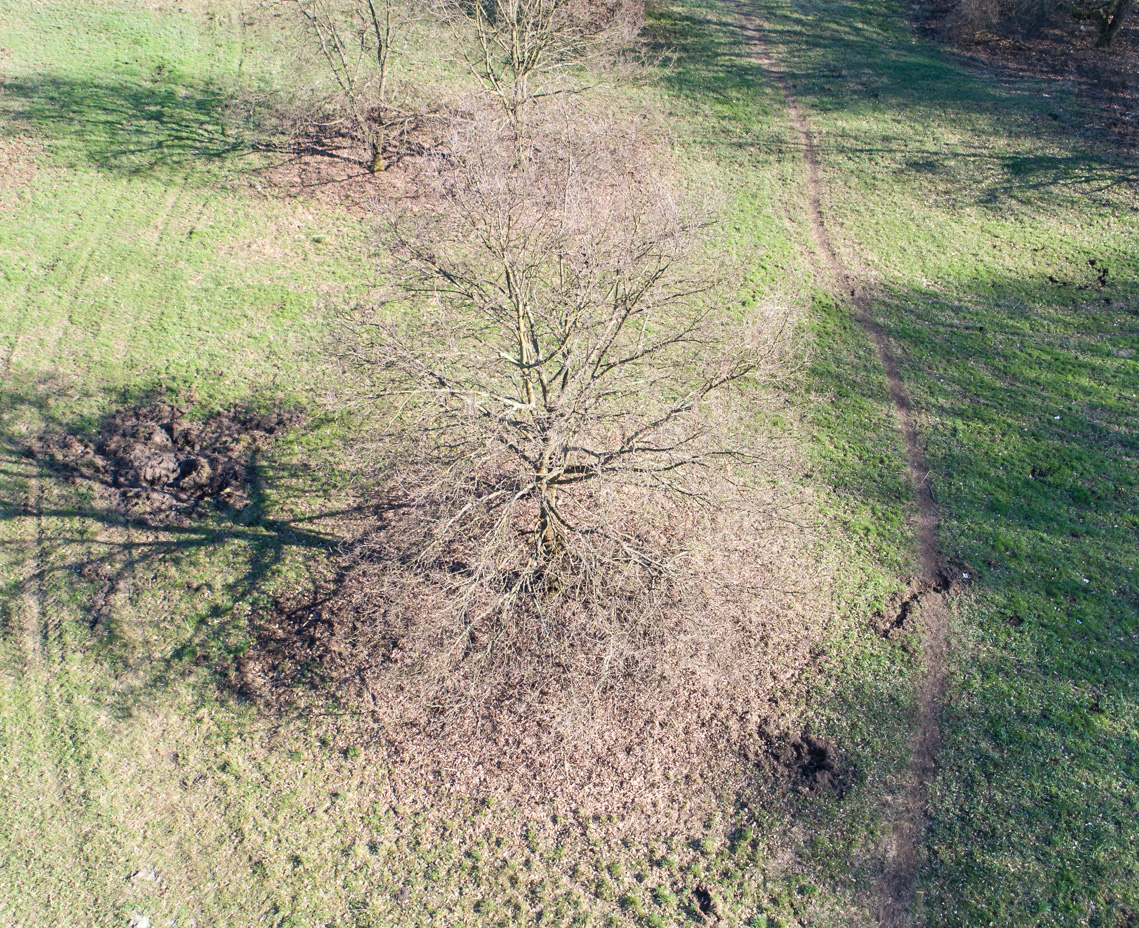
The “Leaf-Off” situation of the tree captured with 45° in POI mode (DNG Raw / 20MP).
Nadir Data mosaic mapping with Drone Deploy
Drone Deploy (https://www.dronedeploy.com) is a subscription based processing service with different subscription levels. Within the free version you can capture data but only have a limited amount of processing options available. But post processing and point model calculation can also be done without Drone Deploy services by using Lightroom and Agisoft Photoscan.
Nadir mapping is automatically done easily with Drone Deploy. Drone Deploy can be programmed using the Drone Deploy App and defining the area with an online map interface – the project is than downloaded to your operating iPad/iPhone together with all map data, coordinates and programmed height and copter specs. In the field you start Drone Deploy and the copter is manually brought to the altitude level and than you just start the project. The copter immediately starts to fly to the first coordinate where the flight tracks start and beginns to capture the full nadir mosaic. In the example below I defined an 80/80 project with overlap in both directions (Sidelap and Frontlap) of 80% and Drone Deploy automatically generated 79 images for the defined region.
After finishing the copter is coming back to its starting point and I just picked it up manually at shoulder height – easy.
From my testing I would prefer to have the copter fly slower and that the Nadir shots were all done as RAWs without compression. The JPEG capturing clearly is not the optimal setting. Drone Deploy uses per default automatic modes for aperture and ISO and resets the copter to JPEG capture mode. You can change this to manual settings in the “Advanced” Drone Deploy section. Flight speed can also be set up there to a “Max Flight Speed”.
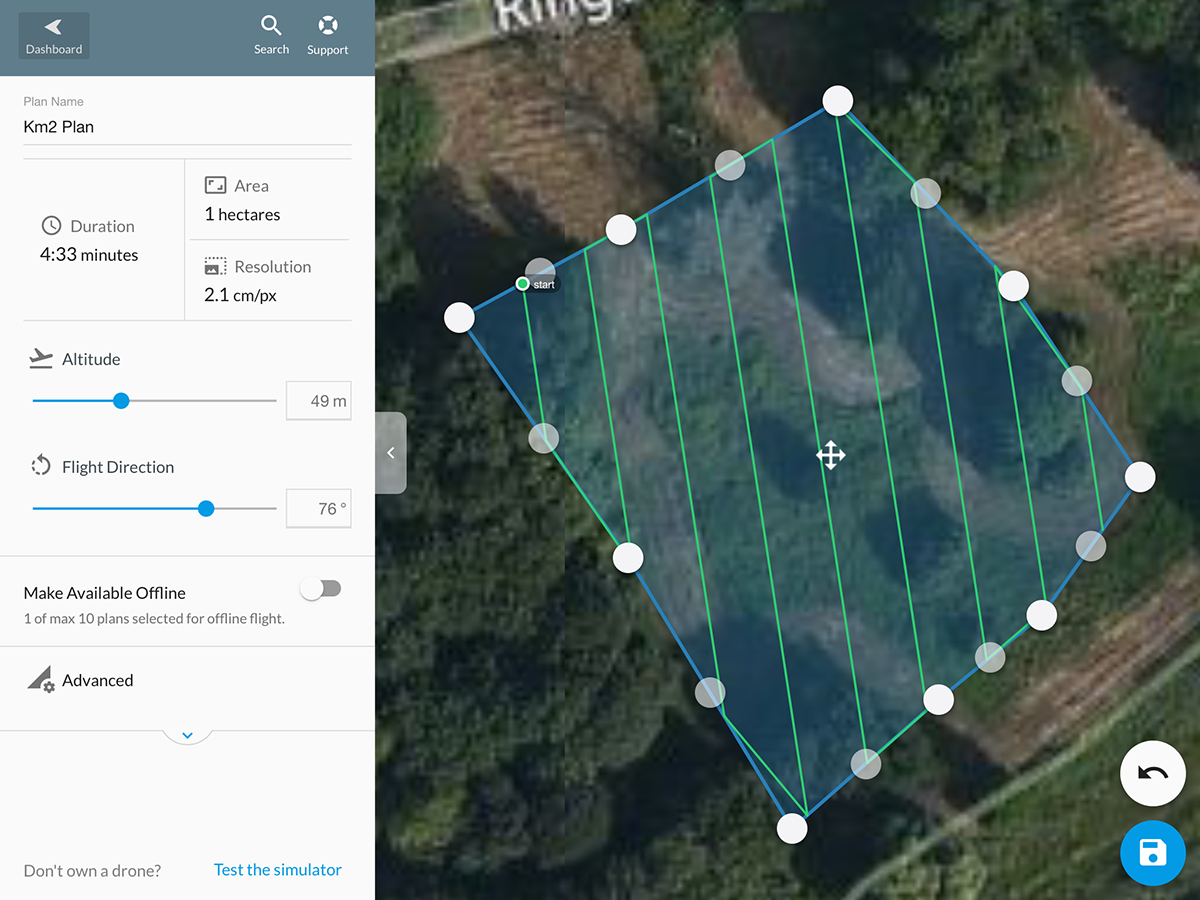
Drone Deploy App on the iPad with the standard window open. Flight length and flightline density is automatically recalculated when you update the area size and or the altitude and flight direction.
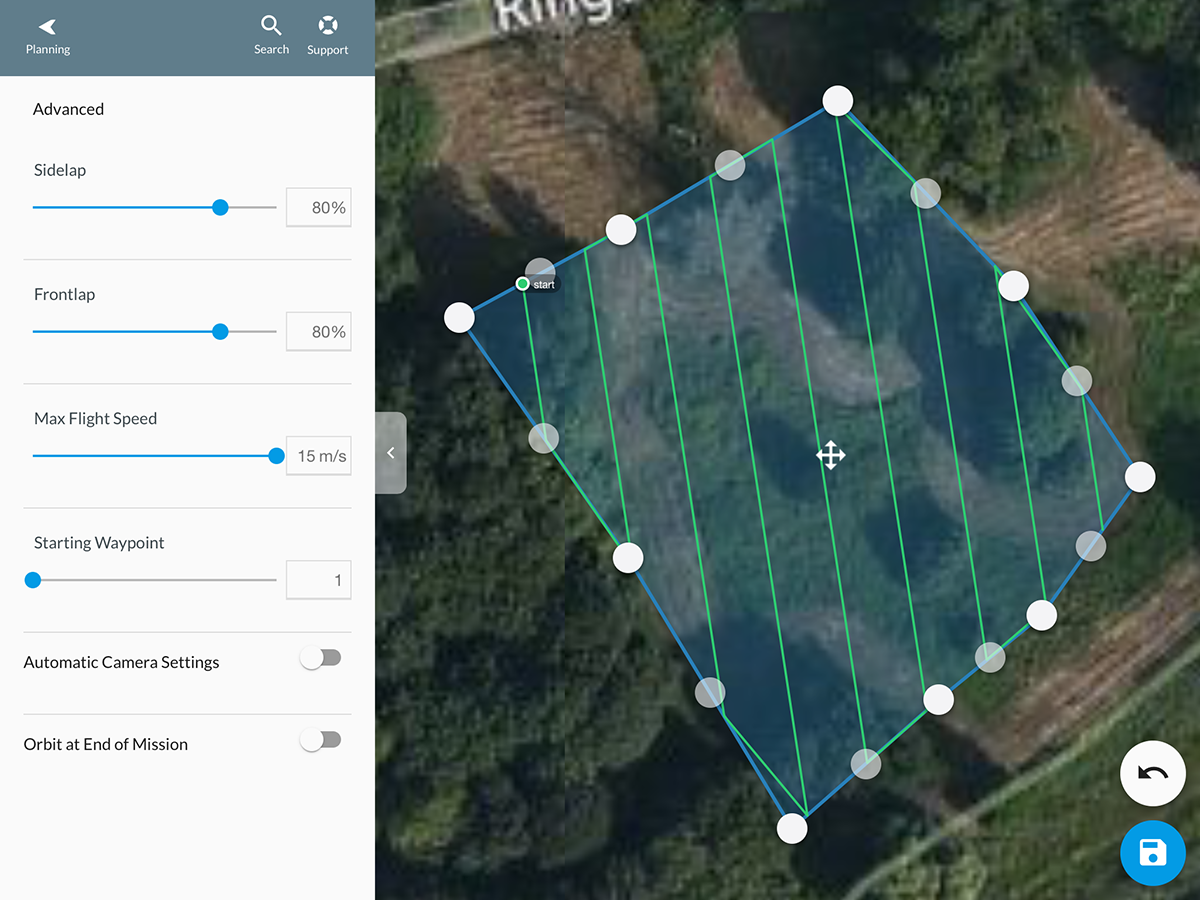
In the “Advanced” section you define overlap definitions, flight speed, camera settings and End Mission behavior.
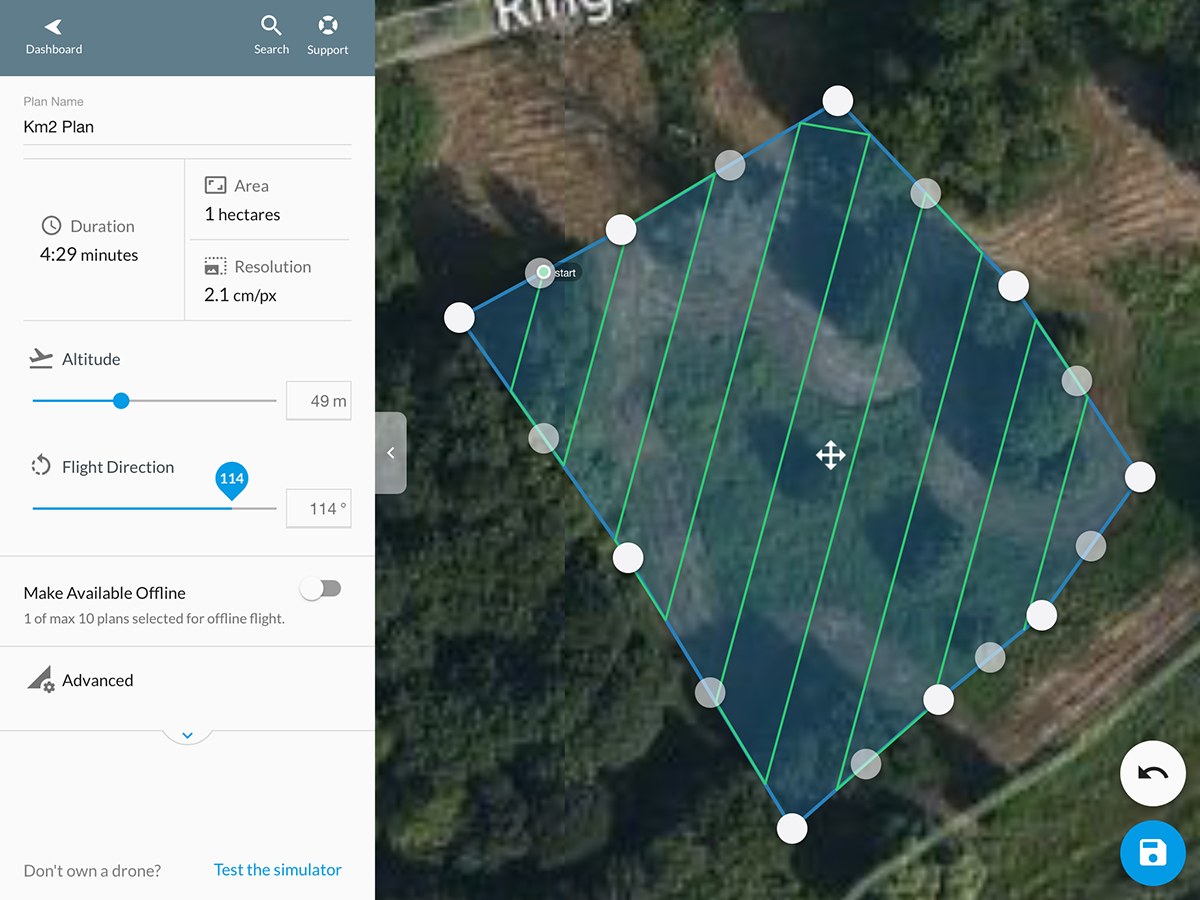
Changing the direction automatically recalculates duration.

Same with flight altitude. If altitude is reduced and overlap is kept constant – the duration and resolution changes. Drone deploy uses the camera specs to generate resolution parameters.
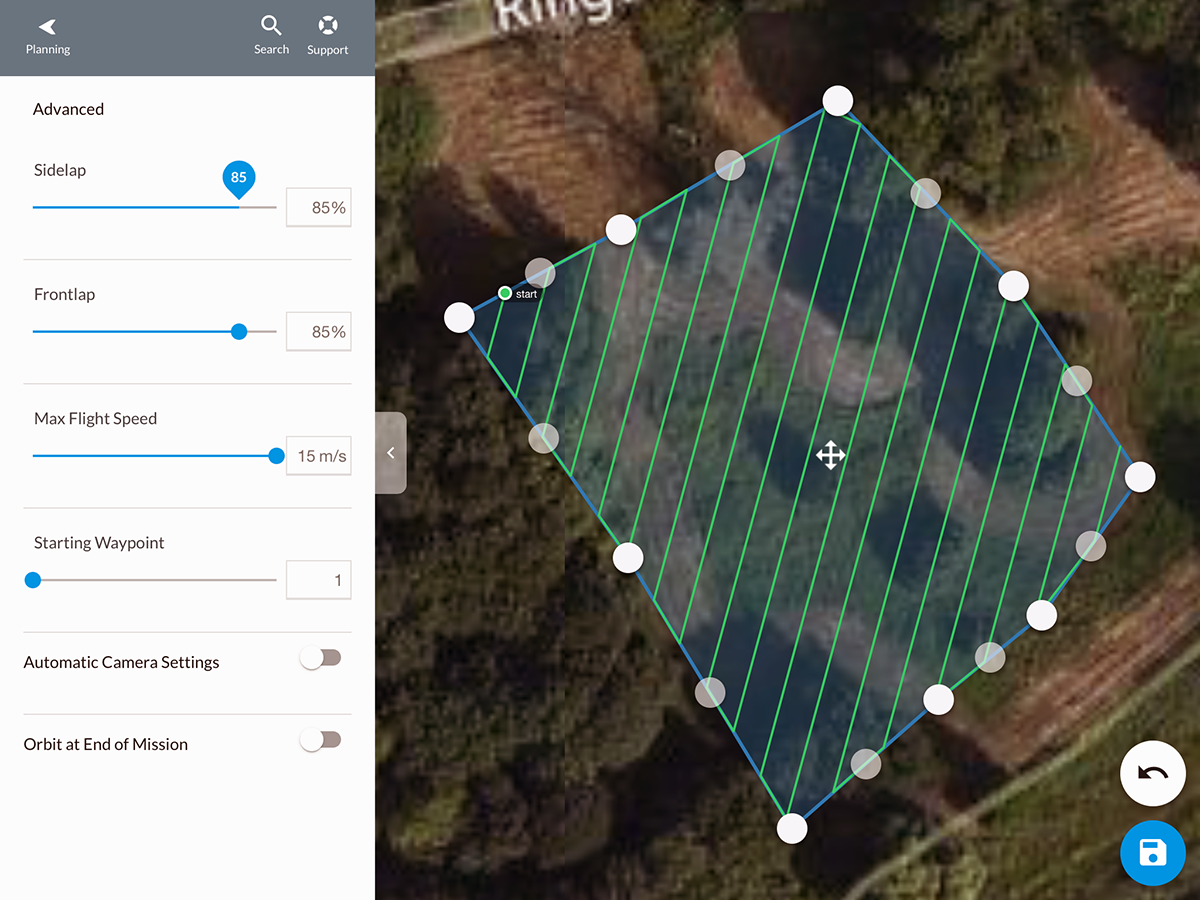
Changing overlap (here to 85%) automatically changes the setup of the flight lines and duration of the flight.

When the automatic capturing is started DroneDeploy checks some conditions and parameters to test GPS stability, card space and controller settings.
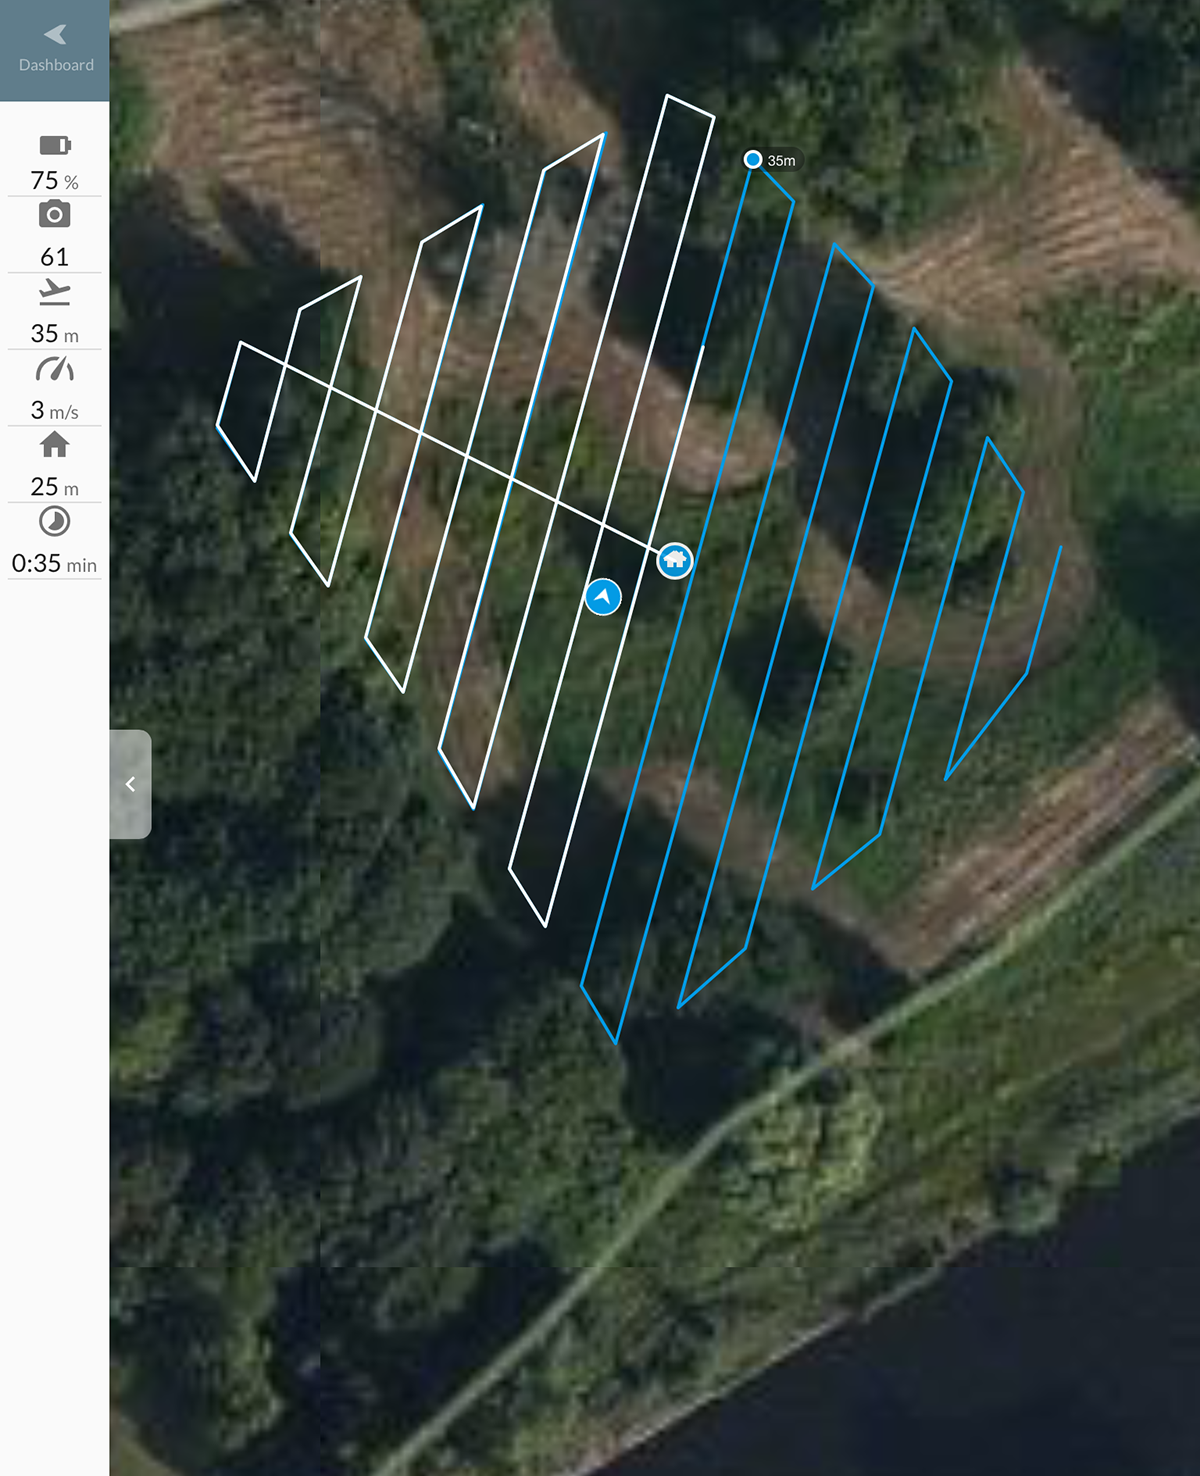
You start the automatic way point flight and monitor the position of the copter relative to the planned tracks. Some flight parameters are shown on the left side of the flight path map.
So far Drone Deploy works well. The software directly asks you to upload the images to their server system for processing when the flight is finished – something we do not want. We want to do the processing in-house – so just skip this step and upload the copter data to your local processing network.
Mtk when point cloud mapping processing finished … .